Pages

Friday, January 18, 2013

Have a little heart!


It won’t be long until the Wee Are The World kids are back and ready to share a little love with you. This collection will work with my Wee Are The World stationery set from Lettering Delights that came out last year. The mini envelope sizes from the stationery sets match these punny valentines.

This collection will have a valentine for each of the twelve kids, as well as an envelope and heart-shaped label (sticker) for each.

Stay tuned and check back soon. I will give you the details as soon as they are available at LD.

Wherever you live around this great world, you can always share the love with your peeps, great or small. These wee kids can help you do that in a sweet and silly way.

Friday, January 4, 2013

Will 2013 be Panda-monium for you?


Lettering Delights is off to another great year and I’m so delighted to have a part in their fun! You can be too if you start your year off right with the perfect calendars to keep you organized.


Whether you feel like you life is full of pandemonium, or as tranquil as a field of flowers, I have the perfect calendars to keep you on schedule all year long.

Lettering Delights is offering two of my calendar designs for you to choose from, or get both to be even more up to date and fashionable.

What’s black and white and cute all over ~ the panda calendar for you or the kids with my little panda bears enjoying seasons and events throughout the year. This Pandarama 2013 Calendar is available to print and trim as a large wall calendar or miniaturize it for a collection on the wall, or easels.


If you love beautiful flowers and want to enjoy theme every month of the year ~ the Cut Flowers 2013 Calendar is just the thing for you. It has a selection of flower patterns from many of my floral collections, compiled into this lovely calendar, so you can have cut flowers every day of the year.


To get either or both of these calendars click here to get right to them on LD. You will want to get them right away, so as not to miss any more days in fabulous 2013. It’s off to a great start for me, I hope it is for you as well. Happy 360 days left!

Monday, December 31, 2012

Wee end the year with Chrissy the Camel


I have spent the last twelve months with my Wee are the World kids, each month with a different wee one from around the world, ending today with little Cairo and his companion, Chrissy the camel.

I want to share a little story about Chrissy, because in fact I did not name this camel Chrissy, she came to me with the name. When I was designing this little Egyptian boy and his camel, I was researching camels to see the basic shapes that would help when illustrating the animal.


I googled “camel” and to my surprise and enjoyment I found a darling soft toy camel sewn with fabric that I recognized (see photo above). The camel is one of many soft toys that Pauline McArthur of Funky Friends Factory has designed. She is an amazing pattern designer of three dimensional characters. You must visit her website and you will see the creations that never end from her wonderful talent.

Well, it turns out that the fabrics she chose to make the soft toy, Chrissy, are two of the fabrics I had designed for the Swell Noel collection (in fabric named “Have a Sheri Berry Holiday”). In a very fun round about way Pauline inspired my illustration of Chrissy the camel, after the fabrics inspired her to make it. I just love this connection, because it reminds me that it is a small world after all, and when you find creative friends from around the world (Pauline lives in Australia) they are only a click away. Pauline and I may never get to meet in person, but I feel I know her through the sweet softness of the animals she creates and the personal approach she takes in designing her patterns. She loves what she does and it shows in every stitch she makes.


There is one more round-about to this story. The magazine Australian Homespun approached Pauline to create a custom toy camel pattern for their Christmas in July issue (2010). This is where the inspiration of Chrissy actually originated. As you can see, Chrissy is helping to decorate this cover of the July 2010 issue. Inside the magazine is an article on Pauline McArthur and detailed step-by-step instructions on how to make your own camel that she designed.


Pauline is one of many artists who didn’t start her career in this industry, but took the bold step to follow her heart and her passion for creating soft toys (see photo of Pauline above). She now has a thriving business that she loves to greet every day. I certainly have a soft spot in my heart for Pauline and wish her the very best in the new year with much success in her Funky Friends Factory.

Monday, December 24, 2012

Pajama Party on Christmas Morning


When I was growing up we would open presents on Christmas Eve. With our own children for twenty years now, we open presents on Christmas morning.


We have photos over the years of those early Christmas mornings with the two kids in pajamas, eager to open their gifts. First, when they were tots it was footie pajamas, next long johns, and a few years later pajama tops and bottoms with robes were worn. 


For me growing up, one of the gifts I remember getting over and over at Christmastime from my grandmother was in fact pajamas (because they were a practical gift:). I still have a light pink nighty that she gave me when I was three, which later became my daughter’s “Fridy-nighty,” as we called it, which she wore only on Friday nights.


My favorite pajama look for little ones has always been the union suit style. It’s the footie kind without the feet. I thought it would be fun to make some pajamas to hang on a Christmas closeline this year and did this using many of the Swell Noel papers as the PJs patterns. I have a free downloadable file of the pajama pattern if you would like to make your own Christmas pajamas. See it at bottom of post.


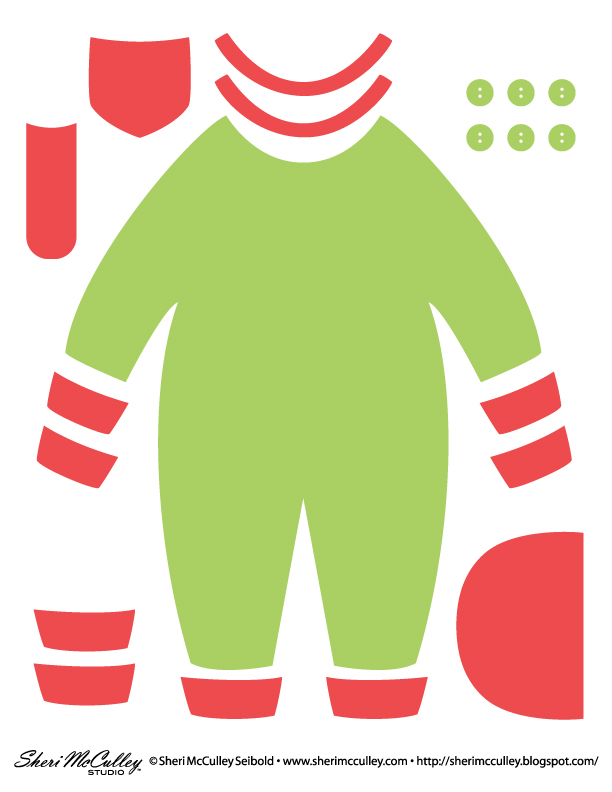
With the pattern, just cut out and use as an outline shape (for the body, arm and leg cuffs, pocket, neck and back flap), or you might be able to use the outline pattern with your cutting machine, to do the tedious cutting for you. 


On the pattern, I have provided two sets of cuffs for each limb (front and back). I did this because you might want to print and cut pieces for both sides of the pajamas. This is what I did, as you will see in the photos, I have shown fronts and backs of all of the clothes. This way, you can hang the PJs on the tree, give them as cards or gifts, or hang them in a doorway or window, where they can be seen from both sides.


Once I chose the Swell Noel paper designs to use for the pajamas I cut them out after printing on both sides of the paper. I then cut out coordinating paper as the cuffs, pockets, back flap, etc. for the trim on the pajamas. I used buttons, lace and other bits and pieces to embellish each pair of pajamas as I saw fit.


I also used the Swell Noel tags, cut-it files and print and cut files to embellish the pajamas, making sure to have a gift tag for each pair, tucked inside the back flap of the PJs to coordinate with the pieces.


To make the back flap into a pocket, I made sure to only glue around the rounded curve of the flap and not the top, straight edge. However, it would be very cute to glue only the top, straight edge of the flap, so that a little message could be placed and read if the flap is lifted.


I also used flocked ribbon for the green pair of pajamas (on the cuffs, flap and deer—as seen in the photo above). This gives a bit of texture to the art.
  

This pattern, above, shows you what your downloadable file will look like to create your own pairs of Christmas PJs to hang around in this season.


The image, above, shows the pieces in red as the extras parts, and the green union suit in the shape for the Swell Noel paper designs.

To get the Swell Noel papers, tags, cut-it and print and cut files used in this project go here. To get the free pajama patter go here or click on my U-Pick button at the right, then choose from Sheri’s Creations the file name SwellPJsPattern.

To bring back memories of the little ones in your own life, opening presents in their PJs on Christmas morning, make a few pairs of pajamas to keep and hang in your home over the Christmas present and Christmas future. 

Have a very Merry Christmas from my home to yours!

Sunday, December 23, 2012

Christmas cards on display


We all gets many holiday cards this time of year and I have a few ideas to help you show off those cards of caring from your friends and loved ones.


For any of the cards you receive that are folded, you can hang them over this swaying garland, made to fit as many cards as you wish to display.


To make the swags of medallions to hang the cards from you will need the Swell Noel medallion set on LD. They require six sides per medallion. Choose, print and cut six pieces that match in shape and size. Once you have all six pieces, you will fold each down the middle, place one half of one piece directly in line with another half of another piece and glue those two halves together.


Repeat this until you have all but one folded piece left to finish the complete medallion. At this time you will position the very long strand of string (ribbon, baker's twine, etc) into the middle of the set, but do not glue it into place, only position it (as you will want to shift the medallions along the string as you have cards to display between them). Then glue the last medallion piece into its position, while making sure the string has not also been glued down (for movability). Continue making medallions until you have as many as you like for displaying with your hanging cards, shift them into place and hang.


These swags of garland can also be used on the tree for trimming or can dangle in rows along windows or doorways, sharing a bit more cheer throughout the house. They can be hung vertically or horizontally depending on their purpose.


To make the Merry Christmas garland (shown above) you will need the Swell Noel garland set on LD. I printed out each oval of letter, printed a complimentary patter (from the Swell Noel paper packs) on the back and then trimmed each oval to spell out the greeting.


I then glittered each piece with just enough sparkle to give the look of glistening snow. I found a charming bit of lace with pearl beads to attach each letter to the next to make a dangling garland to hang in the doorway. This garland would look lovely hanging down a long thin window by a front door, to greet to your guests.


And if you want one other swell swag you can use any of the 3-D ornaments you have already made and let them shimmer as they dangle from your own fluffs of garland and a few colorful mini ornaments dotted between. These Swell Noel ornaments, medallions and garland can be found on LD by clicking here.


Now, along with your Christmas cards on display, you can swagger with pride as you display your garlands of glee this Christmas season.


Happy Holidays from me to you!