Bringing back an easy and fun craft from my grandmother’s days of long ago, I wanted to share this craft with you for a renewed Easter basket projects. Unlike grandma’s crafting, we now can make these baskets with our cutting machines that help save us time, which we now use up blogging about the crafts ;)
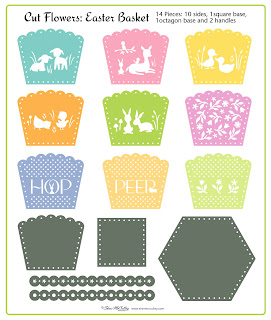
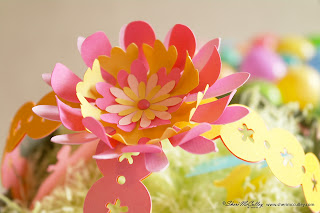
In the photo at top you can see the basket made into a four-sided berry style basket with handles and also a six-sided hexagon wider basket. In the photo directly above you can see the other sides of these two baskets. In the image below you will see the Cut Flowers Easter Basket file you will need for this project on Lettering Delights.
The sample baskets I am showing are with the animal silhouettes, but as you can see, baskets can be made with the word designs, the flower pattern, or can even be made with only solid or patterned papers from your own collection (using only the gray shaped basket pieces to make the basket).
To begin making the basket, cut out the stencil shapes and the solid background shapes (they are shown in gray) with card or cover stock paper (making sure to use as heavy of paper for the base as possible). Cut out as many sides as you will need for the basket; four or six, keeping in mind you will need that many solid colored backgrounds (example: gray) too. You may want to have a basket with two or more designs for the sides (alternating or choosing a different design per side) so cut accordingly. I chose to alternate two designs with the berry basket and three designs with the hexagon basket (two times each).
When you have all of the pieces for the sides and bottom of the basket cut out, you will start stitching them together. I would suggest at least 30-36 inches of string (I used crochet thread) per side for stitching. Take one of the stencil sides (I will use blue as the example) and position it together with its solid background piece (shown in gray), lining up the holes. Then take the next stencil side/design of the basket (I will use green with its solid gray back lined up with it) and hand stitch the blue and green sides together. Leave about six inches of string before stitching, start at the bottom and stitch up in a zig-zag stitch, then back down zigging and zagging the opposite way to make the “X” shaped stitch. When doing this you should keep the blue and green sides (with their gray backs) at about a 120º angle while stitching together, so as not to get the sides too tight or close together (keep the string loose, to shift and position easily). If making the four-sided basket, keep the sides at about a 90º angle when stitching. Once you have those two sides stitched together leave enough string at the ends at bottom for tying off, but do not tie knots in the string yet. You can use a large, dull embroidery needle to stitch the basket sides together, though the holes are big enough to do it without a needle if you prefer.
You will repeat this stitching process (for the hexagon basket, with the blue/green/yellow sides) next the yellow side stitched to the green, then the new blue side stitched to the yellow, the new green side stitched to the blue, the new yellow stitched to green, then finally the blue side that you started with stitched to the last yellow side to complete the six-sided basket. Once all six (or four) sides are loosely stitched together start stitching the base to each side of the basket with the holes lining up (saving about 6-12 inches of string at the beginning and end to tie off when finished). Use the same “X” zigzag stitch for attaching the base to the sides until you get all the way around the basket. When all of the stitches are finish attaching the basket together, gently knot each side at base and tuck the tied strings into a hole at each corner inside the basket. These strings will be covered up with grass or goodies.
You may want to give the basket a handle (as shown in the photos of the four-sided berry basket) and that is done easily by cutting out the scalloped strips from the file. I chose to double up on the handle by lining two colors of the strips together and having two handles criss-cross at the top (as shown in the close up photos above). I attached the handles at all four centers of the sides (of the berry basket) with little brads, then attached the handles at top with a brad to hold the handle into place. I also attached a layered flower (from the Cut Flowers files) at the top also using the brad.
One additional fun element I chose for filling these baskets was to use the cut outs that were left over from the basket sides (the little animals) to position in the grass. See photos above. The files needed for this project are the Cut Flowers Easter basket, but you can also use any Cut Flowers files (of flowers) and also the animal and nature icons (shown directly below) for this and other Easter projects.


2 comments:
These are so cute Sheri, thanks for the great tutorial.
Michelle x
Again, you're welcome! Now, basket-make away!
Post a Comment