Pages

Monday, December 31, 2012

Wee end the year with Chrissy the Camel


I have spent the last twelve months with my Wee are the World kids, each month with a different wee one from around the world, ending today with little Cairo and his companion, Chrissy the camel.

I want to share a little story about Chrissy, because in fact I did not name this camel Chrissy, she came to me with the name. When I was designing this little Egyptian boy and his camel, I was researching camels to see the basic shapes that would help when illustrating the animal.


I googled “camel” and to my surprise and enjoyment I found a darling soft toy camel sewn with fabric that I recognized (see photo above). The camel is one of many soft toys that Pauline McArthur of Funky Friends Factory has designed. She is an amazing pattern designer of three dimensional characters. You must visit her website and you will see the creations that never end from her wonderful talent.

Well, it turns out that the fabrics she chose to make the soft toy, Chrissy, are two of the fabrics I had designed for the Swell Noel collection (in fabric named “Have a Sheri Berry Holiday”). In a very fun round about way Pauline inspired my illustration of Chrissy the camel, after the fabrics inspired her to make it. I just love this connection, because it reminds me that it is a small world after all, and when you find creative friends from around the world (Pauline lives in Australia) they are only a click away. Pauline and I may never get to meet in person, but I feel I know her through the sweet softness of the animals she creates and the personal approach she takes in designing her patterns. She loves what she does and it shows in every stitch she makes.


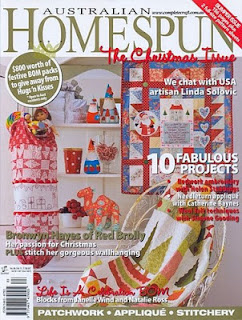
There is one more round-about to this story. The magazine Australian Homespun approached Pauline to create a custom toy camel pattern for their Christmas in July issue (2010). This is where the inspiration of Chrissy actually originated. As you can see, Chrissy is helping to decorate this cover of the July 2010 issue. Inside the magazine is an article on Pauline McArthur and detailed step-by-step instructions on how to make your own camel that she designed.


Pauline is one of many artists who didn’t start her career in this industry, but took the bold step to follow her heart and her passion for creating soft toys (see photo of Pauline above). She now has a thriving business that she loves to greet every day. I certainly have a soft spot in my heart for Pauline and wish her the very best in the new year with much success in her Funky Friends Factory.

Monday, December 24, 2012

Pajama Party on Christmas Morning


When I was growing up we would open presents on Christmas Eve. With our own children for twenty years now, we open presents on Christmas morning.


We have photos over the years of those early Christmas mornings with the two kids in pajamas, eager to open their gifts. First, when they were tots it was footie pajamas, next long johns, and a few years later pajama tops and bottoms with robes were worn. 


For me growing up, one of the gifts I remember getting over and over at Christmastime from my grandmother was in fact pajamas (because they were a practical gift:). I still have a light pink nighty that she gave me when I was three, which later became my daughter’s “Fridy-nighty,” as we called it, which she wore only on Friday nights.


My favorite pajama look for little ones has always been the union suit style. It’s the footie kind without the feet. I thought it would be fun to make some pajamas to hang on a Christmas closeline this year and did this using many of the Swell Noel papers as the PJs patterns. I have a free downloadable file of the pajama pattern if you would like to make your own Christmas pajamas. See it at bottom of post.


With the pattern, just cut out and use as an outline shape (for the body, arm and leg cuffs, pocket, neck and back flap), or you might be able to use the outline pattern with your cutting machine, to do the tedious cutting for you. 


On the pattern, I have provided two sets of cuffs for each limb (front and back). I did this because you might want to print and cut pieces for both sides of the pajamas. This is what I did, as you will see in the photos, I have shown fronts and backs of all of the clothes. This way, you can hang the PJs on the tree, give them as cards or gifts, or hang them in a doorway or window, where they can be seen from both sides.


Once I chose the Swell Noel paper designs to use for the pajamas I cut them out after printing on both sides of the paper. I then cut out coordinating paper as the cuffs, pockets, back flap, etc. for the trim on the pajamas. I used buttons, lace and other bits and pieces to embellish each pair of pajamas as I saw fit.


I also used the Swell Noel tags, cut-it files and print and cut files to embellish the pajamas, making sure to have a gift tag for each pair, tucked inside the back flap of the PJs to coordinate with the pieces.


To make the back flap into a pocket, I made sure to only glue around the rounded curve of the flap and not the top, straight edge. However, it would be very cute to glue only the top, straight edge of the flap, so that a little message could be placed and read if the flap is lifted.


I also used flocked ribbon for the green pair of pajamas (on the cuffs, flap and deer—as seen in the photo above). This gives a bit of texture to the art.
  

This pattern, above, shows you what your downloadable file will look like to create your own pairs of Christmas PJs to hang around in this season.


The image, above, shows the pieces in red as the extras parts, and the green union suit in the shape for the Swell Noel paper designs.

To get the Swell Noel papers, tags, cut-it and print and cut files used in this project go here. To get the free pajama patter go here or click on my U-Pick button at the right, then choose from Sheri’s Creations the file name SwellPJsPattern.

To bring back memories of the little ones in your own life, opening presents in their PJs on Christmas morning, make a few pairs of pajamas to keep and hang in your home over the Christmas present and Christmas future. 

Have a very Merry Christmas from my home to yours!

Sunday, December 23, 2012

Christmas cards on display


We all gets many holiday cards this time of year and I have a few ideas to help you show off those cards of caring from your friends and loved ones.


For any of the cards you receive that are folded, you can hang them over this swaying garland, made to fit as many cards as you wish to display.


To make the swags of medallions to hang the cards from you will need the Swell Noel medallion set on LD. They require six sides per medallion. Choose, print and cut six pieces that match in shape and size. Once you have all six pieces, you will fold each down the middle, place one half of one piece directly in line with another half of another piece and glue those two halves together.


Repeat this until you have all but one folded piece left to finish the complete medallion. At this time you will position the very long strand of string (ribbon, baker's twine, etc) into the middle of the set, but do not glue it into place, only position it (as you will want to shift the medallions along the string as you have cards to display between them). Then glue the last medallion piece into its position, while making sure the string has not also been glued down (for movability). Continue making medallions until you have as many as you like for displaying with your hanging cards, shift them into place and hang.


These swags of garland can also be used on the tree for trimming or can dangle in rows along windows or doorways, sharing a bit more cheer throughout the house. They can be hung vertically or horizontally depending on their purpose.


To make the Merry Christmas garland (shown above) you will need the Swell Noel garland set on LD. I printed out each oval of letter, printed a complimentary patter (from the Swell Noel paper packs) on the back and then trimmed each oval to spell out the greeting.


I then glittered each piece with just enough sparkle to give the look of glistening snow. I found a charming bit of lace with pearl beads to attach each letter to the next to make a dangling garland to hang in the doorway. This garland would look lovely hanging down a long thin window by a front door, to greet to your guests.


And if you want one other swell swag you can use any of the 3-D ornaments you have already made and let them shimmer as they dangle from your own fluffs of garland and a few colorful mini ornaments dotted between. These Swell Noel ornaments, medallions and garland can be found on LD by clicking here.


Now, along with your Christmas cards on display, you can swagger with pride as you display your garlands of glee this Christmas season.


Happy Holidays from me to you!

Saturday, December 22, 2012

Don’t open ’til Christmas!


When you wrap your gifts in these papers, you won’t want them to be opened until December 25.


When I was a little girl my grandmother would save all of the gift wrap after the presents were opened, carefully pealing off the cellophane tape, folding the paper on its already made creases, and storing it away for another Christmas future.


That was a time when you saved and reused just about everything. Well, I too have a hard time throwing away perfectly good gift wrap. For me it is mostly because I look at it as a work of art, and that not just the gift inside the wrapped box is something to treasure, but the gift wrap itself. And, like my grandmother, I just hate to throw things away.


Well, I wish I had saved many of those abc (aka: already been creased) wrapping papers that grandma had stored away, because I just love the artwork of that time period.


Which brings me to Swell Noel, a collection I have designed with all of the charm, fondness and retro-kitsching that those mid-century years bring back to my memory.


The designs from this collection have been made into ornaments, scrapbooking supplies, cards, wrapping papers . . . and now are brought to you by Lettering Delights.


The papers available in the Swell Noel collection with LD have been put into two sets, with 12 designs each. They are great for scrapbooking, card making, backgrounds, and of course for gift wrapping. This is my favorite way to use the paper pattern designs. The photos show many of the paper designs and some ideas on how to wrap with them, and the gift tags that are also available on LD.


So, if you haven’t finished wrapping those Christmas presents, and don’t want anyone to open their gifts until Christmas, you will want to get the Swell Noel paper packs and tags  from LD ~ but don’t wait until December 25!

Friday, December 21, 2012

Oh, Christmas Treat!


The stocking may be hung on the chimney with care, but have you taken care of your handmade ornaments with the Swell Noel paper crafting collection now available on Lettering Delights?


This year, I have been making ornaments for the tree with the Swell Noel ornaments and medallions sets on LD. These are not difficult to make.


They require six sides per ornament (which means you will print and cut the same ornament (bell or medallion) six times. Once you have all six pieces, you will fold each down the middle, place one half of one piece directly in line with another half of another piece and glue those two halves together.


Repeat this until you have all but one folded piece left to finish the complete ornament. At this time you will glue the ornament hanger (ribbon, baker's twine, etc) into the middle of the set, making sure it is secured, and then glue the last ornament piece into its position. Once they are dry, it will be time to trim the tree with your own handmade creations.


To make the long ornaments that have the white deer and the “Merry Christmas” and “Happy Holidays” ornaments, I cut out only four pieces to create the 3-D ornaments. I used the red with white deer for two sides and the green with white deer for the other two sides. In the case of these examples I chose not to crease the shaped directly down the centers, but rather bend them, and glue along each edge with the matching shape on either side, remembering to add the hanging string before glueing the last piece in place.


I did not add glitter to these 3-D paper ornaments, but that sparkle would be a great touch and bring a little glistening snow into your cozy home for the holidays!


The bells and medallions were made like the ornaments with six sides. For the bells, I chose to trim off all of the balls that dangle from the bell, expect for one. I then took one of the trimmed balls and glued it to the back side of that remaining ball, so both sides would have the colored ball visible.


To get these and other files for your own tree trimming, go to the Swell Noel collection on Lettering Delights so that you can be home-made for the holidays!

Party on . . . you’re invited


Get these free party invitations to compliment the theme of your swank and stylish holiday party, or your cozy little get-together. 


I have two free party invitation designs for you to download, print, trim, stuff into A7 envelopes and mail to all your party guests this holiday season. You might even want to have two parties, just to be able to use both designs. Of course I do expect to be invited to at least one of the events. :) 


You can find these free invitations by clicking here, or by going to my U-Pick button on the right (the file name is SwellNoelPartyInvited.jpg). Simply download the file, print on 8.5 x 11 card stock, trim and send in A7 envelopes, and just see how many people join your celebration this holiday season.


Make your party decor, holiday gift wrapping and all-around cool crafts with the Swell Noel collection on Lettering Delights to complete the look. The guests at your party might just think they have traveled back in time . . . and want to stay!

Reindeer Games


Are you ready for a swell freebie? It’s a reindeer game that any age can play and everyone knows how. Use it at the Christmas party for the little ones, or for your own swank holiday get-together.


If you want an old fashioned favorite with a cool yule twist, you might want to have your guests pin this one on. It’s “pin the nose on the reindeer,” complete with 15 glowing red noses and one dashing deer. If you’d rather add you own dimension to the game, just get little pom pom balls to use for the noses and give each player a different color, then add a bit of tape, and get this party started.

You can get this freebie to coordinate with all of your other Swell Noel crafting and decorating creations this holiday season. To find the complete Swell Noel products on Lettering Delights click here and see the holiday frenzy that awaits you.


To download the free Reindeer Game click here or go to my U-Pick button on the right (download the file named ReindeerGames.jpg). This “pin the nose on the reindeer” file with deer and noses will print well on an 11 x 17 sheet. Once you have the game printed, trim the red noses from the bottom of the  sheet and cut each out for your players to pin on the deer. Let’s see who hits the nose on the spot!

Merry Christmas and happy pinning!