Pages

Monday, October 31, 2011

A tiny package that was a hoot to open!

Okay, so the daughter got the care package and it really wouldn’t have mattered what was inside, because a care package in college is simply all about the fact that you received a package and what’s inside is just the icing on top. This care package even had a black tee shirt she’d forgotten at home, last visit, but even it was a hoot to re-get . . . since it was in a wrapped box. :)

Of course the halloween staple was included, candy obviously, and also a few other tiny trinkets that could fit into the small owl and green medallion boxes. Shrinky dinked costume characters fit quite well into a box of that size and even some trinkets from a gumball machine found their way into the little owl box. These are little harvest creatures made of rubber; a fox, a rabbit and a squirrel and they seem to be all the rage right now from little tikes to big college kids. They have even invaded the common brick and mortar stores and are known on the aisles as Squinkies. Pretty much rubber in a mold, but the cutest mound of rubber that you ever did see.

In my time the cutest trinket at the five and dime was something called a Zoolery. It was a tiny caged animal hanging on a chain, to be worn as jewelry from the Liddle Kiddles collection. Today, it would be marketed as either a Squinkie or a Teensie of Littlest Pet Shop but with a bigger price tag attached and possibly found at the 5$ and 10$.

Whatever the generation, there will always be tiny things to find and collect. Whatever the age, getting a care package is always exciting, you might even say, it’s a hoot!

Happy Hooting!

Sunday, October 30, 2011

Special Delivery S-care Package!


Time to send a care package which my daughter must get in time for Halloween to be in the spirit. Lucky for me, my nephew will be at her school for college days on October 31, so the s-care package will be hand delivered just in time.
My, how time flies. When my two kids were little ones we had such fun dressing them in non-traditional costumes for Halloween. I believe one of my daughter’s first costumes was of a little old lady, complete with baggy hose around her little ankles, a pocket book hanging from her tiny wrist, and granny glasses framing her sweet face. None of those scary costumes like devils, ghosts and bats were worn by my kids. No, no, I reserve those costume themes for my art. :)

Actually, if I could have make costumes to look like the sweet Costume Clubhouse kids out of fabrics I’m sure I would have dressed my daughter in the silly spirits tiptoeing ghost and my son in the black acro-bat balancing on the iron fence. Those two characters capture my kids’ spirits, maybe that’s why they are my faves of the Costume Clubhouse kids.
Well, we must have loved the senior citizen theme for costuming quite a bit, as a few years later my son got in on the action with his own little old man look, complete with plaid shirt and clashing tie.
Even my niece joined the party that year with her very own styling of senior-ity fashion. I love the graceful poses and the missing teeth, just like the real thing. :)

Aaww, this would be one of those sweet moments between my two kids. They still are sweet to one another. Hummm, wonder if it helps that the daughter is away at school? :)
And this would be my nephew, now all grown up and towering over the rest of us, heading to college days today. He was the only kid in our bunch that year to dress in a costume of the times. It must have been around 1999 as Buzz was making the buzz with Toy Story 2 in theaters at the time. At five, my nephew was going to be “in” for Halloween, not “out” or “old” like his older sister and cousins that year.

Now he’s off to check out college and be my personal courier. How quickly it all happens. From those silly, little costumes to grown up life. Hey, that’s a little like it was for Andy in Toy Story 3. Well the nice thing is we can always share hand-me-downs in costumes and toys with the next generation and there will always be photos to remind us of the good ’ol days, when our kids were the little ones, all excited to go door to door and beg for candy.

Friday, October 28, 2011

The Monster Mash Bash! All Goblins Welcome!


Halloween is creeping around the corner and it’s time for the bash of the season. Complete with Halloween treats, decorations and party activities for kids of all ages, it’s time to start the fun.
As you enter the berry scary studio and start up the stairs you are greeted with the less than menacing Costume Clubhouse kids and a few boxed favors on the wall.

The hottest spot at the party is the “Got Candy?” table with lots-o-sweets for all to eat. The main table has its own share of goods and goblins to share as well.

One can never have enough candy handy, so pile it on and theme it up even more with candy trim via CC borders and a round of ribbon for the cupcake stand.
Party on with the kids as they play Pin the Tail on the Cat, Bag of Bones, Wrap the Mummy, Carnival Coin Toss and even get a little Silly with String, because that is what parties are all about. That, and the sweets.
Bags stuffed with treats will finish off the party as each little goblin grabs and goes from the happy haven of the Costume Clubhouse to the haunting darkness that lurks beyond.
To create your own Costume Clubhouse party just in time for Halloween, visit the Lettering Delights site where you will find the files to make each of these decorations, party favors, games and more. Some of the games are freebies from my U-Pick button, so prowl around there for a few more treats. Also visit my earlier posts throughout October to get the scoop on each of these partying projects.

Happy Halloween to all and to all a sweet and safe night!

Wednesday, October 26, 2011

Let them eat cupcakes!

Cupcakes used to be the staple for every party during the school year when someone would have a birthday and his mom would show up at the end of the day, passing out her homemade cupcakes. Now cupcakes are making the news for every kind of celebration from first birthdays to weddings. Now you can find cupcake wrappers and toppers everywhere for every purpose.
I know where you can get the perfect cupcake wrappers and toppers for your Halloween party. I know where you can get great cake stand trim and straw toppers too. What I don’t know is if you know the secret to these wrappers and toppers.
The Costume Clubhouse Cupcake Pack and Borders from LD are the first part of this secret to your deco-party craft. How your create with them is the rest of the secret.

To make the cupcake wrappers, simply print and cut the characters of choice and wrap around your cupcakes. The toppers need only be printed, cut and have toothpicks glued to their backs before they are put into the cupcakes.
For the straws, again use the cupcake toppers and cut small slits near the top and bottom of each circled cameo to thread the straw through. This is also a great way to keep organized who has which drink as each person will be able to choose his favorite character. There are 16 different characters in this wrapper and topper set.
Now, the secret to the scalloped cake stand trim (see photo above). I designed some of the CC Borders to use for cake stand and plate trim. This is also a very simple craft to add to the look of the party. Simply print and cut the borders of choice. If you choose a border with the small slots near the straight edge (see sample below) you can then thread a ribbon, string or strip of paper through the slots and attach the trim to a cake stand or plate. Measure the circumference of the stand to determine how many borders you will need to print and cut, and then glue them together before threading the ribbon. I taped my trims onto the stands with double stick tape as it makes it easier to remove later.
One additional bit of decor that can be adapted and used are the little costume kids (from the CC Characters). Once they are printed and cut they can circulate your cake stand as if marching and chanting for their treats.
Some of the photos used in this posting are from my niece, who I was lucky enough to have with me when shooting this collection. She’s an amazing photographer who specializes in landscape and historic scenes from the mid and northwest, primarily in Montana. To see more of her beautiful photography and learn more about her go to my Besties section at the right and choose “Open Spaces Prairie Places” or click here to take you to her site.

Tuesday, October 25, 2011

Who-o-o Goes There?


Who will be stopping by your house on Halloween this year? Probably the traditional little witches, devils, cats and mummies. You might even see a few animals of the season, maybe a squirrel or owl, both appear to be in of late and are popping up everywhere.
When my son was a mere two years old I dressed him in a squirrel costume, constructed from various thrift finds; complete with a fox tail reinterpreted into squirrel fashion. I remember him squatting at his little, plastic jack-o-lantern full of candy, as though he really was a little squirrel collecting his autumn stash. So adorable, so dear to my memory. His older sister was an acorn, of course, because squirrels are to acorns as peas are to carrots, or salt is to pepper.
The costumed squirrel was an addition to my Costume Club collection last year, along with the costumed owl and raccoon. I wanted to give Halloween a more autumnal feel and with the memory of my son squatting in his little squirrel costume the inspiration was perfect for creating these characters. There is nothing cuter than a little one in an animal outfit.
If you want to dress your yard with some of these Costume Clubhouse kids it’s an easy task to take on. Just print and cut the CC graphics set from LD and spray mount them to foam core or cardboard for durability. My costume kids are about 17 inches in height.

When the kids come calling next week, see how many costumed characters are traditional black cats and white ghosts, or if there are a few trendy owls and squirrels scampering about. Who-o-o’s to say witch is cuter? If they are kids, they all are.

Monday, October 24, 2011

Spirited Acro-Bats!

Whether these little acro-bats are tiptoeing through the tombstones or dancing along the fence near my stone wall they are full of spirit and ready to welcome the evening guests come Halloween night.
The iron fence has had its share of indoor and outdoor use. It accompanied the little ghosts at my first Surtex Show and has been repurposed a few times be it springtime or autumn here at the berry-house. Its origins are from Target (no, not an old English cottage, sorry to say:) but its permanent dwelling is here with the Costume Clubhouse members.
The bats and ghosts were printed and cut from the CC graphics set by LD and then glued to foam core for durability. I also used 18 gauge wire to push into each in order for them to stand independently in the ground beside the iron fence.

This is the same decorative set of bats and ghosts I have hanging from the rafters in the studio, resting on their own little clouds of orange and green pompoms. See the October 20 posting for details.

Now, it’s your turn to go and do your own interpretive dance with these bats and ghosts.

Sunday, October 23, 2011

Got Milk Bottle?


Time to turn back time and reinvent the nostalgic game of “Drop the Clothespins in the Bottle.” This was a game I think I played at every party I attended when I was a child. Now I have come up with a version that I think will delight the newest little skeletons in our lives during this season’s Halloween parties.
There are very few supplies needed to turn this bag of bones into a bag of tricks and likely you have nearly everything you will need to do so. If you have Q-tips you have almost everything you need for the game as they will become the bones for each player. As we all learned when we were little skeletons, all bones need milk to make them strong, so find that milk bottle that used to have milk in it as you will need it for the bones to be dropped into. If you don’t have a milk bottle, a jar will suffice as long as the opening is not too large.
I have made a set of “Bag of Bones” labels for you to print out along with the milk bottle label and colored strips that can be cut, wrapped and glued around each Q-tip bone. This is so that each player has his bones identified with the color he has chosen. I gave each player a set of 10 color coded bones per bag, but you can use less if you like. Then I put each set of bones in little zipped baggies for each player to have his set for the game, glued labels on each bag and the label on the milk bottle.
See sample printout above for the labels and color strips, then go to the U-Pick button at the right to click and download this free game for your party.

If you are unfamiliar with this game, it is very simple. Use a chair for each player to kneel on when it is his turn to try to drop his bone into the milk bottle, which is on the ground directly below the back of the chair. The player will hold his bone at chest height and try to drop it into the bottle. Players will take turns in rounds until each player has attempted to drop all of his bones into the bottle, at which time the game is over. Once the bones that have made it into the milk bottle have been counted, the player who has gotten the most bones (with his color) will be the winner.
Enjoy this game with skeletons of all ages, even if there are a few old bones hanging around who can remember the game from their childhood days. They might even be the best at this nostalgic game and prove to all of us that there is no age limit to having fun.

Friday, October 21, 2011

This black cat will cross your path on Freebie Funday!


Every party since the beginning of time has had its version of pin the tail on the donkey. Well, at least for over a hundred years. This year you can have the Costume Clubhouse version of this iconic American game by simply downloading the freebie from my U-Pick button at the right.

The “pin the tail on the cat” game board can be printed out on an 11x17 sheet and nailed or taped to the wall. The cat tails can also be printed on an 11x17 and cut out for up to 20 players.
If you want to make your own fun blindfold in keeping with the theme of Costume Clubhouse you can go to Lettering Delights for the CC Masks and choose the mask you like best. If you print the mask on an inkjet t-shirt transfer, you can then iron it to a white 100% cotton fabric. Make sure you have plenty of fabric on either side of the transfer to tie a knot around a head; at least one yard.
This is the sample of the cat game board you will download of your own black cat.
This is the sample of the 20 cat tails you will print and cut.

Let this be the only black cat that crosses your path this time of year and it will change your superstitious opinion to start giving you lots-o-luck when the cats come a-prowling.

Thursday, October 20, 2011

Hanging around ’til Halloween


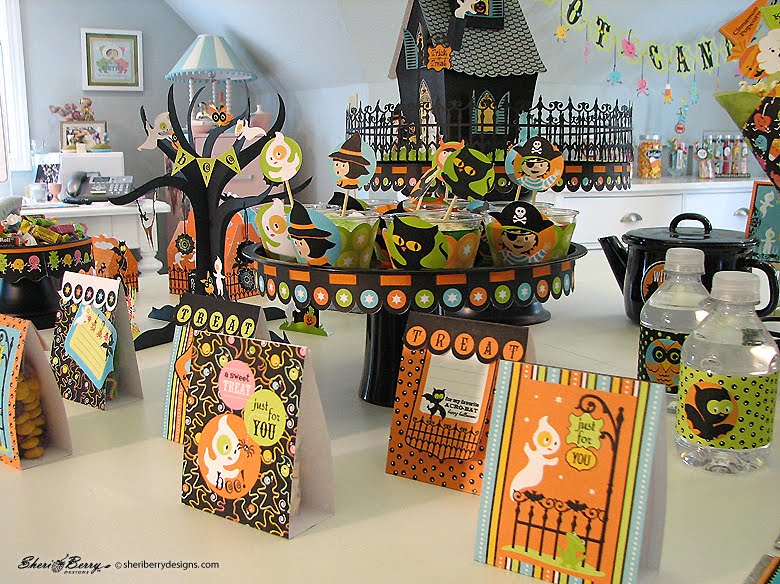
Nothing makes the statement that a party is on like streamers and banners. They are on, they are in, and they are about the partying scene like never before. So get with it and get your banners, streamers and garland on and up for Halloween so that everyone knows you are in this season.

Once again, an easy group of projects that will not only show your Halloween enthusiasm on the outside of the house, but inside as well when your party is on, and very in.
Almost everything you need for these banners and garland are likely house hold items hanging around your house begging to swing with style. Got string? Got straws? Then you’re off to a good start. Now, a little glue, tissue, some small craft brads and a few files from the Costume Clubhouse collection by LD and you are going to be ready for creating.

Here is the list of Costume Clubhouse LD files I used from the cut it sets: CC Banners, CC Garland and CC Webs (or you can get the three sets in the bundle). Also the CC Borders, CC Sweet Treats (for the candies) and CC Characters (for the bats and ghosts). I also used the CC Alphabet (for got candy? letters).
The “Happy Halloween” bunting banner is pretty much self explanatory; just print, cut, fold in half to points and glue or tape together with string or ribbon sandwiched between. Make sure you have plenty of extra string on each end of the completed banner for hanging.
For the “Trick or Treat” garland: print and cut the circular letters/icons on orange background and two of the medallion spiders. Print and cut the black webs (14 total). If you want to attach the webs with small brads, simply make a pinhole punch on the left and right points of the webs and attach each to the next in line. See close up below. Then glue or tape the “trick or treat” words and spider medallions (between each word) onto the webs. Add string or ribbon to hang.
The “Got Candy?” garland is done like the “trick or treat” garland with a few changes. Print and cut the green webs (10 total), the letters from the alphabet to read “Got Candy?” and the candy icons of your choice from the Sweet Treats set. Attach the green webs together left to right with the pinholes and brads. Glue or tape the black letters to each web with a candy icon between the two words. Use the brads that attach the webs together to hang little candy icons between each web (make small pinholes in the top of each candy for hanging). See close up below.
To make the hanging streamers with tissue pompoms and spider medallions you will need to print and cut the following: medallion spiders from the “trick or treat” garland set. (I used two green with two orange to make each crisscross medallion with 12 points, and two yellow with two blue for each crisscross medallion with 18 points.) Borders of choice for the wavy pieces (I used the ghosts and owls, printed on both sides, from the CC borders). Borders of choice for the scalloped pieces (I used the scalloped words in black–“trick or treat” and in orange–“happy halloween” and printed two of each for each piece). I also used the scalloped borders with dots and stars (two of each for each piece).
Have plenty of string to work with as you make these streamers. You will need to glue the pieces together with the string sandwiched between every time to make a new segment.
To make the wavy pieces (see close up above) you will hole punch (.25" hole or larger) approximately every 2" in the middle of the vertical border (left to right) to make about nine holes. Then you will thread a straw (with string inside) through and gently tighten to make an accordion wave.

For the scalloped vertical borders you will simply glue the two pieces together making sure to sandwich the string between as you glue. Add colorful straws between the segments to cover the string as you go.
The photo above shows the pieces needed for the vertical streamers. Notice the blue spider medallion folded in half (at center of photo). This is how you will fold and then glue spider medallions together to make a cross or ‘x’ with the string sandwiched between.

An easy way to cover the string with straws is to slice the straw with scissors and then wrap around the string. This way you will not have to thread each straw and can add those, choosing color and length once the streamers are done. The sliced straw will not be visible and super easy to attach. I’m into this trick and think it will be more of a treat for you when creating this otherwise dexterously-challenged project. Also, an extra pair of hands might be welcomed for this craft. Okay, so the streamers are a little more complicated, but come on, so festive you’ve got to try them.
The only other hanging decor to make are the bats and ghosts playing on the pompoms. These are simple as you will print and cut the characters of choice (as large as about 8.5 x 11), two each in mirror image if you want them showing nicely from each side while hanging. Once you have the tissue pompoms made (with plenty of string on each end) you will glue the two sides of the character together, sandwiching the string between so that there is plenty of string to hang the playful pompoms.

Now, get your craft on and get these festive streamers and banners hanging to prove you’re in this Halloween.