Pages

Friday, March 29, 2013

Spring flowers ~ forever fresh


It isn’t Easter time without daffodils, tulips and of course Easter lilies. I have a way for you to force these bulbs to bloom right now and become a beautiful bouquet in time for Easter Sunday.

I have created another set of Cut Flowers files for Lettering Delights, this time for the Easter ~ Spring season. This complete set comes with daffodils, tulips, Easter lilies, hyacinths, crocuses and lily of the valley flowers. You can see the complete set of the flowers in the diagram below and tutorials for each type of flower to help in making your own bouquet.


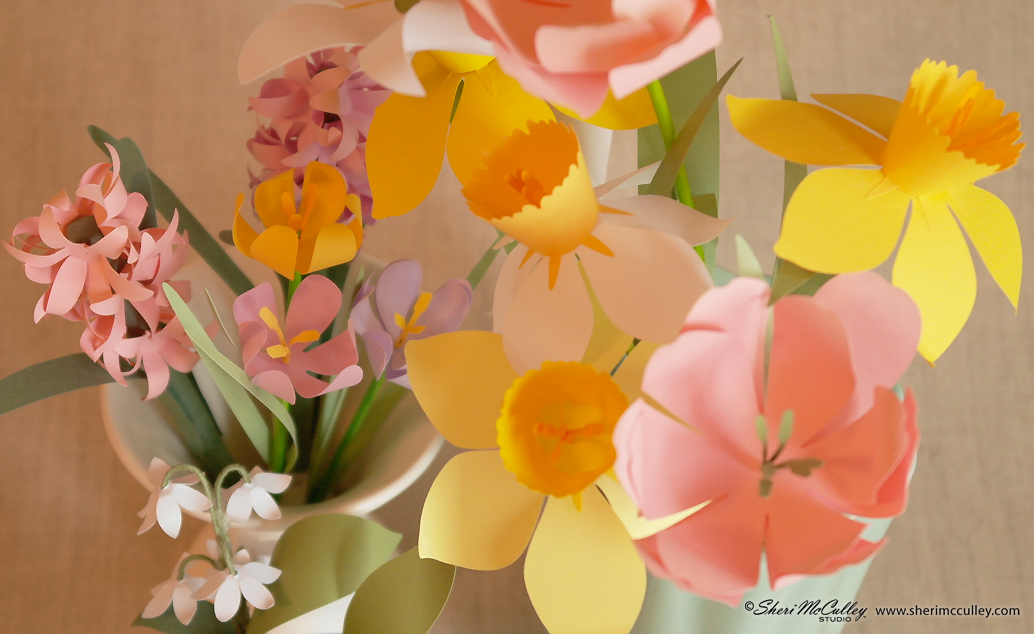
To make the tulip flowers use the tulip petals and leaves (I chose to have two petal sets). Cut out the petals on text weight paper, bend into cup shape by using dull scissors (or I use a bamboo skewer) to gently bend the individual petals into shape (both inward and outward at the ends). Then thread over painted or dyed bamboo skewer that becomes the stem for the tulip (using the center hole that is in the middle of the petal pieces). Next, make the stamen (once it is cut out of text paper) by twisting it tightly around the skewer and gluing it over the pointed end of the tip of the skewer (after you have positions the petals as you like them). Cut out the leaves and glue them (use tacky or white glue) onto the green skewer stem to complete the flower. For the tulip and the daffodil flowers I used a 10 or 12 inch skewer for the stem.


To make the daffodil flowers cut out all pieces of the flower using text weight paper in appropriate colors. Make the bell/cone of the flower by gently bending (rolling) the piece into a trumpet or bell shape and glue the ends of the rolled piece together. Bend the main petal flower downward with the skewer or dull scissors and then glue the bell/cone shape to the main petals (matching up the pointed tips of the cone to the center of each petal. (see white daffodil in photo above). Next, make the stamen by twisting it tightly around the skewer and gluing it over the pointed end of the tip of the skewer (after you have positions the petals as you like them). Cut out the leaves and glue them onto the green skewer stem to complete the flower.


To make the Easter lily flowers cut out all pieces of the flower using text weight paper in appropriate colors. Make the trumpet of the lily by gently bending (rolling) the piece into a cone shape. Bend the ends of each petal flower outward with the skewer or dull scissors and then glue the ends of the trumpet shape together. Next, make the stamen by twisting it gently around the skewer and gluing then individual stamen piece with the others. As the stem for this flower I used thick florist green cloth wire so the lily would bend out from it. I used a glue gun to attach the trumpet and stamen (tucked inside the trumpet to the end of the wire and then also glues leaves down the wire. You could also use a skewer for the stem, but I think a bend in the stem is nice for this type of flower and a wire looks better.


To make the crocus flowers use the same instructions and technique as described for the tulip, with the exception of bending the petals inward and not back outward. Also, to make the leaves for this flower twist them tightly around the skewer and glue near the base of the painted or dyes green skewer that becomes the stem. For this flower I used a six or eight inch skewer.


To make the hyacinth flowers cut out many star shaped petals from text weight paper to have enough for a full flower. Then shape each petal by bending it into shape with the skewer (bending the petals away from the center outwardly). Once there are enough petals, glue them onto a dyed (or painted) wooden dowel with a glue gun, about a .25-.375 inch dowel and about 6-8 inched long, positioning them around the dowel. Then glue the leaves quite far down onto the dowel-stem to complete the flower.


To make the lily of the valley flowers cut out many of the little white star shaped petals from text weight paper. Once cut, shape each flower with the skewer, bending inward and outward each petal. I chose to use green cloth florist wire to hang the flowers from and glue gunned each white flower onto the curved end of the wire. I then glued all of the wired flowers together with the glue gun and covered up the wire cluster with the large lily of the valley leaves. There is a stem shape in the file that can be used for the little white lilies to hang from, but you will need to use thick paper if you are using that stem and glue each flower shape to it.


To make this lovely spring bouquet in time for Easter, go to Lettering Delights and you will find the Cut Flowers Easter set to choose this set and many others for your Easter and spring celebrations. Have a happy Easter this year!

A simple statement for Easter


I love the look of silhouette art as it can make a clean and direct statement without a lot of fuss. This year I thought it would be fun to spring into Easter with those direct and basic icons that specifically say Easter ~ the bunny, the chick, the lamb, the duck and of course the egg. I added a few additional animals to complete the springtime look.


These egg shaped silhouettes can be found on Lettering Delights and be made into hanging eggs, or used in cards, crafting, Easter signs and decor, and many more spring and Easter projects. In the image, just above, you will see the artwork that is on the file available. The egg art is made with two main layers ~ one is the silhouette of the animal, and the other is the framing egg shape surrounding the animal. I also provide you with trim for each egg that can be used for hanging the garland of eggs or for other crafting. It would be cute just to use the trim as paper chains any time of year.


Above is a photo of all of the eggs that are vertical designs.


Above is a photo of all of the eggs that are horizontal designs (minus the word eggs).


To make these silhouette eggs, I simply cut out each part of the egg design ~ the top layer, which is the framing egg shape; the middle layer, which is the silhouette of the animal; and the base layer, which is the solid egg background (in this case I used a charcoal gray paper).


After each layer was cut out (and the two layers of trim for hanging), I spray mounted the silhouette animal layer to the gray egg, then the top framing layer to the middle layer. I then attached the top trim layer with spray mount to the gray base of the trim and then used a brad to loop the handle over and attach it to the top, center of each egg, shown in the photo above with the deer scene, and the photo below.


These silhouette eggs can be used inside or outside for Easter. You can even use the stencils to spray your own art onto just about anything you can think of with spray paint, chalk or even egg dye and a spray bottle. Let’s see what you can do with the world of stencils this Easter. I can’t wait to see!

To get your set of Cut Flowers Easter silhouette eggs go here to LD and start stenciling away!

Thursday, March 28, 2013

Panorama eggs ~ sweet as sugar


I have always loved sugared eggs with those pretty, little panorama scenes inside the beautifully decorated eggs. They were too lovely to eat and usually sat on a shelf for months after Easter had passed.

I wanted to make my own version of these eggs without the temptation of eating them, so I designed a set of patterns to use with paper. These templates are available on Lettering Delights within my Cut Flowers Easter collection, as Panorama Eggs. Here are the patterns you will get in this set (see image below) and the directions and helpful tips to make these sweet, but not sugared eggs. This set contains: two egg shapes (one with an oval for a window in the egg, and one to make a solid egg), four trim (lace) options, one two-part base, and six mini flower shapes for extra decorations.


The photo below shows the egg with the window option for a panorama egg design (with little duck inside) an the two part base to sit the eggs on.


To make the eggs (solid or window) follow these steps to get the best results, using thinner paper for this project as it will bend more easily. However, the two-part base can be made with thicker paper, but remember it must bend easily to make the stand. I chose 70 text weight paper for all pieces (most from Paper Source). The only other supplies I used were mini brads for attaching all parts and a bamboo skewer to bend the paper into shapes.

1. Cut out all pieces necessary for the panorama egg design: egg (looks like a large 8-pointed star-or with window), trim of choice (looks like a 4-crossed intersection), two-part base (looks like 8-pointed flower and 8 scalloped flower). Then if you would like mini flowers on the egg at sides or top, cut out as many flowers as needed for the decorations. Also, if you would like small animals, use the Cut Flowers Easter Icons to cut the shapes (examples ~ duck and bunny).


2. Make the base first by bending the 8-pointed flower shaped piece with a bamboo skewer, thumb and forefinger so that the 8 points become the legs of the stand and then fold upward the last tip (or foot) of the stand to a 90º angle (as shown in the photo above) to make the piece free-standing. Then bend the 8-scallopped flower shape so that the ends of the scallops bend upward to make a little cup for the egg to sit in. You can then attach these two pieces of base/stand together with a mini brad through the tiny hole in the center of both pieces. Set the stand aside until later.

3. Next, make a slight bend with thumb and bamboo skewer to all eight sides of both the egg and the trim pieces. These will become slightly bowl-shaped pieces. You might want to make a hard crease (fold) where each of the eight sided of the egg and trim attach to their center so that the egg is more flat when sitting on the base.


4. If you are going to add mini flowers to the sides of the egg, I recommend flowers that are either every other piece (side) of the egg, or staggered flowers on each piece (side) as shown in the photo directly above. You can make each of these sets of flowers and attach them together with mini brads and set all aside until you are ready to attach them to the egg and trim shape.

5. Once you have all decorative trims made up (including the top flower, but do not brad it together yet) you can begin assembling the egg.

6. Before attaching the egg to the base, attach each flower where you want it on each piece of the outer curve of each egg and trim side (lining them up with the trim centered inside the egg piece/side) then use the mini brad (that is holding the tiny flower together) to attach the flower in place to each piece/side of the egg. Do this by piercing each side where you want it, then use the brad to hold the flowers into place. Once this is done you should have what looks like a large, slightly bent 8-pointed star with trim along its centers (vertically) and little flowers attached to the pieces where desired with brads. (you can see the flower positions/options and the trim options in the photo below).


7. This is the time you need to think of attaching the main parts in order from bottom to top, as it will be easiest to assemble this way. Start with the base that has been bradded together, undo it and reattach it together in this order: brad, bottom base, top base, trim, egg (with mini flowers), then separate brad and attach all pieces together so that the base is now holding the bottom of the egg (there is a tiny hole in the center of each of these pieces for the brad to fit through). Remember to attach the egg/trim piece with the flowers and trim showing on the outside of the egg when bending up and inward.

8. Now you should start pulling the egg sides up to complete the egg shape and finish at the top with the flower. Take the final flower shape(s) you wish to have at the top of the egg and with the brad pointing down through its center, start pulling the egg sides up toward it and thread each of the eight piece to the brad using the tiny hole to place the brad through. (Here is a tip that might be easier to work with ~ you might prefer to use a dull needle rather than the brad to thread all of the pieces through from top of flower down through the egg and trim pieces ~ then once you have them all threaded through the needle, hold the parts in place while transferring out the needle for the brad that will then attach all parts together). You need to attach the egg sides in this order (think (N) north, (S) south, (E) east, (W) west, (NE) northeast, SW (southwest), NW (northwest), then SE (southeast) when assembling). First choose any side/piece and thread it, (I’ll call it the N side), then pull and attach the S side, next the E side, then W side (so you are attaching opposites), continue on with NE, SW, NW and finishing with SE. If you do it in this opposite-sides-order the egg will be more balanced and look more oblong shaped when finished. Holding all of the eight pieces on the brad with flower at top, now spread the brad to tighten and attach all parts together, squeezing the egg shape a bit to get the brad attached and held into place. Then gently move and position each piece to get the best balance of the egg. See the photo below that shows the top of the egg assembly. This completes the panorama egg (without the window).


9. To make the panorama window egg you will assemble as the above directions. The only difference is with the window style egg, you will cut off the last piece of the 8-sided trim (so that the trim does not go over the center of that side of the egg and cover up the little window). This will mean you have a seven-sided trim to position to the egg and base when attaching together. (see photo below) 


10. Now you can add the little animal cut outs shapes to the inside of the egg. Since the egg has not been glued together, you can squeeze it a bit to get the animal shape (or flowers would also be cute inside the egg) into the middle of the egg. I chose to make a little table base to hold the duck into place, then made a small slit to hold the duck upright on the base inside the egg. Remember, you can have these eggs on their bases, as standing or sitting eggs (horizontal or vertical).

When making this craft you will want to cut the pieces as large as your machine will allow, as it will make the assembly easier with larger pieces to work with. I have only a machine that will cut up to eight inches wide, so my eggs are quite small. You can get the silhouette animal and nature icons for additional decor from the Cut Flowers Easter Icons in my collection on LD. (see image below)


Now you have a new way to make sweet panorama eggs, and if you would like them to look like sugared eggs you can add glitter to the eggs once they are assembled. They will be sweet, but last longer than the original sugared eggs and Easter.

Wednesday, March 27, 2013

A Tisket, a Tasket . . . let’s make an Easter Basket!


Bringing back an easy and fun craft from my grandmother’s days of long ago, I wanted to share this craft with you for a renewed Easter basket projects. Unlike grandma’s crafting, we now can make these baskets with our cutting machines that help save us time, which we now use up blogging about the crafts ;)


In the photo at top you can see the basket made into a four-sided berry style basket with handles and also a six-sided hexagon wider basket. In the photo directly above you can see the other sides of these two baskets. In the image below you will see the Cut Flowers Easter Basket file you will need for this project on Lettering Delights.


The sample baskets I am showing are with the animal silhouettes, but as you can see, baskets can be made with the word designs, the flower pattern, or can even be made with only solid or patterned papers from your own collection (using only the gray shaped basket pieces to make the basket).


To begin making the basket, cut out the stencil shapes and the solid background shapes (they are shown in gray) with card or cover stock paper (making sure to use as heavy of paper for the base as possible). Cut out as many sides as you will need for the basket; four or six, keeping in mind you will need that many solid colored backgrounds (example: gray) too. You may want to have a basket with two or more designs for the sides (alternating or choosing a different design per side) so cut accordingly. I chose to alternate two designs with the berry basket and three designs with the hexagon basket (two times each).

When you have all of the pieces for the sides and bottom of the basket cut out, you will start stitching them together. I would suggest at least 30-36 inches of string (I used crochet thread) per side for stitching. Take one of the stencil sides (I will use blue as the example) and position it together with its solid background piece (shown in gray), lining up the holes. Then take the next stencil side/design of the basket (I will use green with its solid gray back lined up with it) and hand stitch the blue and green sides together. Leave about six inches of string before stitching, start at the bottom and stitch up in a zig-zag stitch, then back down zigging and zagging the opposite way to make the “X” shaped stitch. When doing this you should keep the blue and green sides (with their gray backs) at about a 120º angle while stitching together, so as not to get the sides too tight or close together (keep the string loose, to shift and position easily). If making the four-sided basket, keep the sides at about a 90º angle when stitching. Once you have those two sides stitched together leave enough string at the ends at bottom for tying off, but do not tie knots in the string yet. You can use a large, dull embroidery needle to stitch the basket sides together, though the holes are big enough to do it without a needle if you prefer.


You will repeat this stitching process (for the hexagon basket, with the blue/green/yellow sides) next the yellow side stitched to the green, then the new blue side stitched to the yellow, the new green side stitched to the blue, the new yellow stitched to green, then finally the blue side that you started with stitched to the last yellow side to complete the six-sided basket. Once all six (or four) sides are loosely stitched together start stitching the base to each side of the basket with the holes lining up (saving about 6-12 inches of string at the beginning and end to tie off when finished). Use the same “X” zigzag stitch for attaching the base to the sides until you get all the way around the basket. When all of the stitches are finish attaching the basket together, gently knot each side at base and tuck the tied strings into a hole at each corner inside the basket. These strings will be covered up with grass or goodies.


You may want to give the basket a handle (as shown in the photos of the four-sided berry basket) and that is done easily by cutting out the scalloped strips from the file. I chose to double up on the handle by lining two colors of the strips together and having two handles criss-cross at the top (as shown in the close up photos above). I attached the handles at all four centers of the sides (of the berry basket) with little brads, then attached the handles at top with a brad to hold the handle into place. I also attached a layered flower (from the Cut Flowers files) at the top also using the brad. 

One additional fun element I chose for filling these baskets was to use the cut outs that were left over from the basket sides (the little animals) to position in the grass. See photos above. The files needed for this project are the Cut Flowers Easter basket, but you can also use any Cut Flowers files (of flowers) and also the animal and nature icons (shown directly below) for this and other Easter projects.


I hope you enjoy making these Easter baskets as I have, and many crafters before us. But thanks to technology, we can simplify our work, and therefore craft more baskets for our peeps!

Cut Flowers Easter projects to enjoy all spring


I have a new set for the Cut Flowers collection that is for Easter and springtime. This new groups of sets includes three dimensional panorama eggs, Easter baskets, silhouette eggs, lots of Easter themed animals and nature icons, words and phrases, cupcake wraps and of course the perfect bouquet of Easter flowers to create for this springtime celebration. All of the sets in the Cut Flowers Easter collection are for cut-it files and some will even be easy to cut by hand, should you not have a cutting machine to help you do the work. You can get these files at Lettering Delights by clicking here to get directly to the collection and start hunting for your Easter treasures.


The photos above shows you what is possible to make with the panorama egg set. You can see the art here (also above) of the files you will get in this set. I will give a tutorial of this project on my blog this week, so keep checking back for the details.


You will also be able to make Easter baskets that are square like a berry basket or a hexagon shaped basket. The photo above shows you how these baskets look. You can see the art here (also above) of the files you will get in this set. I will also give a tutorial in detail of this project on my blog during the week.


You always know it’s Easter time when you start seeing crocuses and daffodils blooming outside. This Easter you can even force these flowers to bloom even if the weather outside isn’t quite ready if you get the Easter flowers files from the Cut Flowers collection. Above you will see a few photos of the flowers available along with the set of files to make this beautiful Easter bouquet. The flowers in this set are daffodil, hyacinth, crocus, tulip, Easter lily and lily of the valley. I will also give an in depth tutorial on how to make these flowers on a blog post this week, so remember to check in frequently.


One of my favorite looks in design is a silhouette style of art. I have created a set of silhouette eggs for this Easter holiday to use in many craft projects and decor. You will also be able to get this set of files on LD to create your own Easter theme. Above you will see a photo and the set of files available. Again, I will have a tutorial during the week on how to make these silhouette eggs.

In addition to the files you have seen above, you will find cupcake wraps, Easter and springtime words and phrases and icons available in this complete set of Cut Flowers Easter theme now available on Lettering Delights to use for many projects and crafts this time of year (see images below).


This image (below) shows the complete set of Cut Flowers Easter theme, now available on LD, so hop on over and start preparing for Easter each day this week!


Happy crafting for a Happy Easter!

Wednesday, March 20, 2013

Chicksters and Hopsters for Easter!


I have a new collection on Lettering Delights that will keep those Easter activities hopping along in a hipster fashion this year. The collection is called Chicksters and Hopsters and there is something for everyone, young and old, male and female, hipsters and hadsters.


The sets are available in graphics and print and cut: there are many card designs, two party invitations, lots of labels and tags. As well as party goods for cupcakes, drinking straws, lots of decorative eggs and of course the hipsters themselves in 18 fashionable and individual statements.


In addition to these fun graphics there are signs to point the way to the hip-hoppening parties you will be having. And for uses in a million different ways there are two paper packs of 18 designs each, one of the cool and one of the warm color sets.


Here are a few photos to show you some of the collection ideas, but once you get a hold of these files you’ll have a basket full of your own ideas to share with your peeps this Easter! Hoppy creating!

To find the entire collection of Chicksters and Hopsters go here to get the goods on Lettering Delights.


One fun way to create eggs for Easter without getting dye all over your hands!


Once you have those eggs hidden, use this egg hunt invitation to get your peeps to your party. Or choose an Easter party invitation if you aren’t hunting for eggs, but in the mood to party.


Guests need drink markers, and what better way than this? Now, these are silly straws!


Think cupcake wraps and then think of them as egg holders, yep, they are reversible, and hip!


When you send out your Easter greetings this year, you will have a number of options to pick from with the eight different card designs available in this Chicksters and Hopsters collection. Here are a few below.


Finish off your Easter celebration with labels and tags to personalize for your party guests and gift giving.


Below are the images showing what this collection consists of and the paper packs available in the last image.


Now, get on over to Lettering Delights and start preparing for the hippest Easter party on the block!