Pages

Monday, October 27, 2014

Harvest moon-lighting


You can have a festive autumn swag of lanterns lighting the path for your guests this fall season with a little bit of work and a lot of fun.

I made these lanterns with flowers a few years ago and thought they were so lovely outside during springtime that it seemed even more fitting to have them decorate the deck for the autumn season.


Here is how I made them:

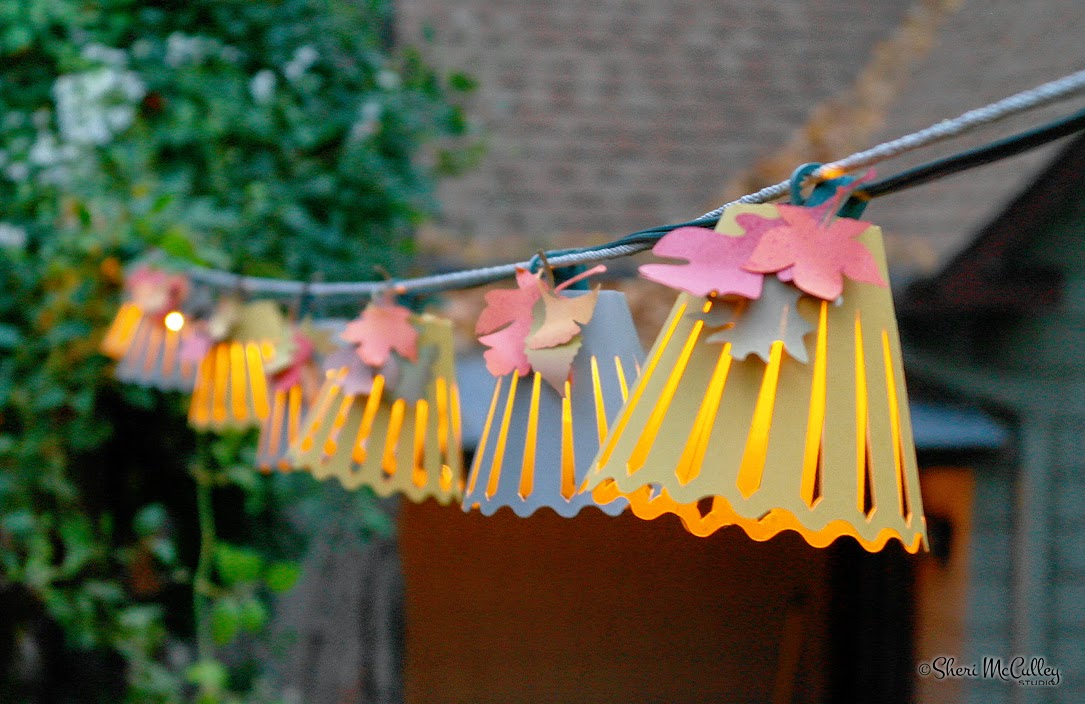
I used the leaf shapes from my Wee Gather Together Leaves  cut-it set on Lettering Delights. I first cut out many colors of leaves about one to two and a half inches in size, using Paper Source text weight papers (colors: moss, chartreuse, curry, poppy, papaya, persimmon). Once cut, the leaves were thin enough to curl into nice bends and shapes. I use a bamboo skewer for curling.


I then laid them out and spritzed them with quick, uneven bursts of spray paint. I used a few spray paint colors to make the leaves appear more blended, like real autumn leaves. When spraying I recommend that you not spray close to the leaves, rather lift the can about one to two feet above the leaves to get a dusting of paint, then repeat with another color. You can see this in the photo above and below.


Once I had about three or four leaves prepared per lantern, I cut out the lanterns in two colors of paper. Paper Source cover or text weight paper works for the lanterns. For the spring lanterns I used text weight, but for these autumn lanterns I used cover weight. The paper colors I chose were gravel and curry. I used the Cut Flower Accessories cut-it project from Lettering Delights (it is in my Cut Flower collection on LD). It is a pattern that can be used for pedestals, but it works great for lanterns too. There are four pedestal designs in the set, I used the green one for these lanterns.


Each lantern is about four inched high. I taped each lantern after connecting it, then glued the leaf sets to each on the opposite side of the connection.


The lanterns have a tabbed edge at the top (about 1/2 inch tall) that must be folded inward to hold the paper lantern over the lightbulb that it is covering. My lights are the circular, clear bulbs (approximately 1.5 inch diameter) in a string of 20 or so lights. The lanterns slip up and over the bulb and hang with the tabs holding them on.


Thinner paper will allow more light to shine through the paper lantern, if you would like that. The thicker paper will make the lanterns more durable, but will not allow for as much light to shine through. Keep that in mind when making your choice of lantern paper.


Now you can enjoy your crisp autumn evenings while sitting outdoors under your autumn lantern lights and the harvest moon.

Friday, October 24, 2014

Gather together and enjoy the season


Autumn is the season that I love the most. It’s beautiful, the weather is lovely, and it has Thanksgiving, a holiday that is a reminder to be grateful for everything and everyone in our lives. I have created a collection that is now on Lettering Delights and it is called We Gather Together. It was developed to help create lovely and fun pieces for this harvest season.

Here are a few sneak peeks of what I’ve been harvesting for this giving season.

You will find something for the kids.


There is something for the elegant decorator.


Also something for the naturalist, woodsy type (well, nature in the form of paper, of course :)


And there is plenty for the holiday crafter.


This collection has a mix of graphic images and cut files. I will be sharing many ideas over the next few weeks and have plenty of “how to” help for the paper crafting autumn leaves, seeds and pods.


I will also share easy ideas for gift giving, and home and kitchen decor. Get ready to gather your friends together for a month of crafting fun. You can go here to see all of the We Gather Together products on LD. Enjoy!

Friday, May 2, 2014

When life gives you lemons . . . you know what to do!


Well, I knew what to do anyway. I have been working on opening my shop on Spoonflower (an online textile, wall covering, gift wrap company). You can click on the link to my shop at the top, right. For those who don’t know Spoonflower, they have a weekly contest with a design theme and I have entered a few times. I’ve made it into third and second place, but this time I am hoping to win that sweet spot and turn these lemons into lemonade.

The contest this week if for a tea towel design that has “recipes” as the theme, for Mother’s Day. I decided to make my theme a “Mom’s Kitchen Sink Advice” tea towel with a recipe, kitchen cleaning tip, and bit of advice that any mom, or the rest of us would give or get with a sweet smile. :)

I am planning to create a set of tea towels with the “Mom’s kitchen sink advice” theme in the future that I will have in my Spoonflower shop along with this one. However, first things first.

If any of you would like to vote for my design, I would love that, but no pressure. I won’t be sour if you don’t, ha ha. I will attach the link and you can vote only once to count. You have until Tuesday, May 6, I think. You do not have to sign up to be on Spoonflower, so no pressure from them either. My art that you are looking for to vote on is above (the lemon theme).

I have decided that if I win the tea towel contest this week I will have my own drawing on my FB artist page for anyone who lets me know they voted for my design. You simply have to get on my page and say “I voted” and I will enter you into my drawing. But again, I can only have the freebie tea towel drawing if I win, so if you get your peeps to vote, that will make a difference too. You can tell them if they want in my drawing they will need to “like” my FB page and let me know they also voted on Spoonflower for my tea towel design.

Here’s the link to the Spoonflower weekly contest (the recipe tea towel contest), then when on scroll down until you find my art, click on the check at the top, left of my design (which by the way will be sideways, the art that is) and submit your vote.

If you want to tell me you voted, go to my FB link and say so in a comment below the image of my tea towel design. Then if I win, you can be in my own free tea towel drawing on Facebook.

If you want to see my Spoonflower shop you can go to this link. I have a few collections up, but more to come in the future. Please note, some of the collections are for sale, but others are not yet, so keep that in mind. This tea towel design is not yet for sale.


Remember, when life gives us lemons we need to turn them into something wonderful; be it sweet to eat, creative, generous, or helpful and kind to others, and above all with a sweet attitude. My own mom advice to self. :)

Now, go out and make any sour lemons turn into a wonderful and sweet life. Remember this all next week (and always) of how much your own mother makes your life sweet  . . . and let her know it!

Monday, March 17, 2014

It’s so easy being green!

So . . . if your last name starts with Mc . . . and your first name spelled backwards-ish is Iresh, (ooow, so close to Irish) . . . then you had better acknowledge this day, right?

Happy St. Patrick’s Day! From your lucky little leprechaun. Go green!

Friday, February 14, 2014

Tea for two kindred spirits


It was only a few months ago that I met two lovely ladies from Tasmania, Australia who are kindred spirits. They have a common passion for the creative joys of needlework and have begun publishing a beautiful online magazine called Kindred Stitches Magazine. They say it best: “There is a special kind of bond between women who love to stitch, whether it is with needle and thread, by hand or machine, with crochet hook or knitting needles.”


Kindred Stitches Magazine has just published issue six, “Fresh and Fun” and they requested that I share a new piece of art as an embroidery project for this issue. What a treat it has been for me to be included in this lovely magazine and have an opportunity to work with the professional team who gives such attention to detail in every aspect of their magazine. I am sure you will agree, so please take a look at their Kindred Stitches site and see for yourself.


The embroidery design I created for the “Fresh and Fun” issue is Tea for Two (foxes in a teacup) based on the alphabet teacup animals I have made into embroidery patterns in my Etsy shop. If you would like to make the Tea for Two embroidery design you will be able to get it by purchasing “Fresh and Fun” (issue six). I assure you, not only will you see the beautiful styling Kindred Stitches Magazine has done for the article, you will find the complete magazine a thing of beauty. Each issue showcases four original projects to make and a guest craft designer, this time featuring Sheri McCulley Studio, as I share my embroidery project exclusive to this magazine.


For each issue they put together a short promotional video which showcases the patterns in the magazine, and you can see the “Fresh and Fun” video here, including images of the Tea for Two project.


I hope you will take time to view Kindred Stitches Magazine. The magazine is distributed via the Apple iPad Newsstand and brings you everything you’ve always wanted in a craft magazine and more. I believe you will quickly become a regular to their love of craft they so beautifully bring to the world in each issue. Enjoy it today with a cup of tea and a kindred spirit!