Pages

Tuesday, November 1, 2011

Strawberry Fields Forever!

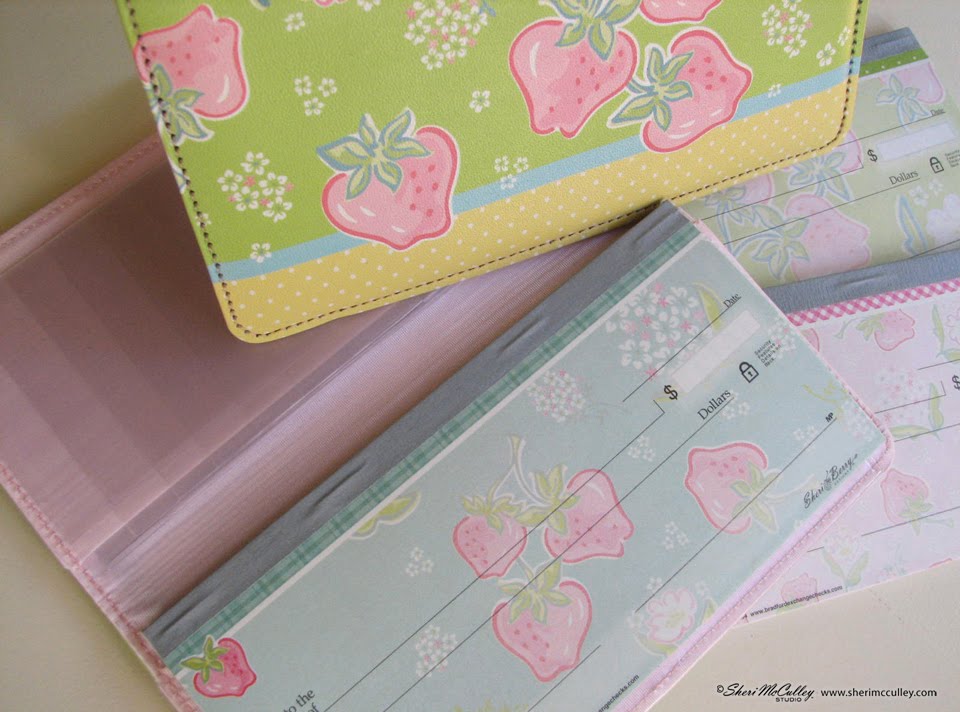
The strawberry season is over, but the berry will always be in season. I have a new check design that just came out with Bradford Exchange and it is all about the berry, the strawberry, that is.
This is one of the patterns from the Berrylicious collection. Now it can be used by many and seen by others when your personal checks are sent to them. Sure, the first thing they’ll get excited about is the amount of cashola they notice on the check, but then they won’t be able to get their eyes off that field of strawberries in blue, yellow, pink and green.
The checks are now available at Bradford Exchange and you can find Strawberry Fields in checks, a checkbook cover and mailing labels.
In case you haven’t been checking in lately, I have a stripe collection that came out last year. This is when a simple design makes that ever famous statement that “less is more” and these checks are nothing less!
The stripe collection also has a checkbook cover and mailing labels in four colorways. If you would like to view the Stripes collection available at Bradford Exchange you can click here to learn more.
This checkbook cover shares a chocolate background with a blended stripe of colors. I love this checkbook cover; it makes a statement without even trying.

Both of these check collections (Strawberry Fields and Stripes) can be found at Bradford Exchange and are also in the product category on my website. Thanks for checking them out!

Monday, October 31, 2011

A tiny package that was a hoot to open!

Okay, so the daughter got the care package and it really wouldn’t have mattered what was inside, because a care package in college is simply all about the fact that you received a package and what’s inside is just the icing on top. This care package even had a black tee shirt she’d forgotten at home, last visit, but even it was a hoot to re-get . . . since it was in a wrapped box. :)

Of course the halloween staple was included, candy obviously, and also a few other tiny trinkets that could fit into the small owl and green medallion boxes. Shrinky dinked costume characters fit quite well into a box of that size and even some trinkets from a gumball machine found their way into the little owl box. These are little harvest creatures made of rubber; a fox, a rabbit and a squirrel and they seem to be all the rage right now from little tikes to big college kids. They have even invaded the common brick and mortar stores and are known on the aisles as Squinkies. Pretty much rubber in a mold, but the cutest mound of rubber that you ever did see.

In my time the cutest trinket at the five and dime was something called a Zoolery. It was a tiny caged animal hanging on a chain, to be worn as jewelry from the Liddle Kiddles collection. Today, it would be marketed as either a Squinkie or a Teensie of Littlest Pet Shop but with a bigger price tag attached and possibly found at the 5$ and 10$.

Whatever the generation, there will always be tiny things to find and collect. Whatever the age, getting a care package is always exciting, you might even say, it’s a hoot!

Happy Hooting!

Sunday, October 30, 2011

Special Delivery S-care Package!


Time to send a care package which my daughter must get in time for Halloween to be in the spirit. Lucky for me, my nephew will be at her school for college days on October 31, so the s-care package will be hand delivered just in time.
My, how time flies. When my two kids were little ones we had such fun dressing them in non-traditional costumes for Halloween. I believe one of my daughter’s first costumes was of a little old lady, complete with baggy hose around her little ankles, a pocket book hanging from her tiny wrist, and granny glasses framing her sweet face. None of those scary costumes like devils, ghosts and bats were worn by my kids. No, no, I reserve those costume themes for my art. :)

Actually, if I could have make costumes to look like the sweet Costume Clubhouse kids out of fabrics I’m sure I would have dressed my daughter in the silly spirits tiptoeing ghost and my son in the black acro-bat balancing on the iron fence. Those two characters capture my kids’ spirits, maybe that’s why they are my faves of the Costume Clubhouse kids.
Well, we must have loved the senior citizen theme for costuming quite a bit, as a few years later my son got in on the action with his own little old man look, complete with plaid shirt and clashing tie.
Even my niece joined the party that year with her very own styling of senior-ity fashion. I love the graceful poses and the missing teeth, just like the real thing. :)

Aaww, this would be one of those sweet moments between my two kids. They still are sweet to one another. Hummm, wonder if it helps that the daughter is away at school? :)
And this would be my nephew, now all grown up and towering over the rest of us, heading to college days today. He was the only kid in our bunch that year to dress in a costume of the times. It must have been around 1999 as Buzz was making the buzz with Toy Story 2 in theaters at the time. At five, my nephew was going to be “in” for Halloween, not “out” or “old” like his older sister and cousins that year.

Now he’s off to check out college and be my personal courier. How quickly it all happens. From those silly, little costumes to grown up life. Hey, that’s a little like it was for Andy in Toy Story 3. Well the nice thing is we can always share hand-me-downs in costumes and toys with the next generation and there will always be photos to remind us of the good ’ol days, when our kids were the little ones, all excited to go door to door and beg for candy.

Friday, October 28, 2011

The Monster Mash Bash! All Goblins Welcome!


Halloween is creeping around the corner and it’s time for the bash of the season. Complete with Halloween treats, decorations and party activities for kids of all ages, it’s time to start the fun.
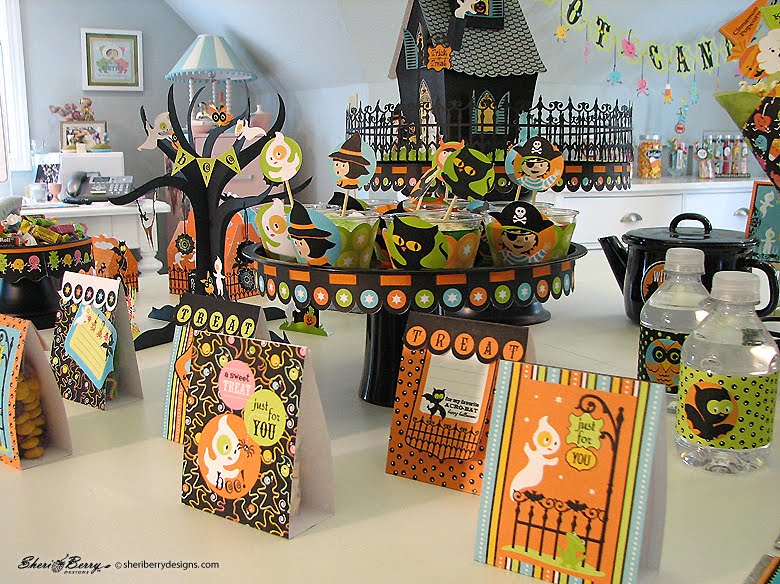
As you enter the berry scary studio and start up the stairs you are greeted with the less than menacing Costume Clubhouse kids and a few boxed favors on the wall.

The hottest spot at the party is the “Got Candy?” table with lots-o-sweets for all to eat. The main table has its own share of goods and goblins to share as well.

One can never have enough candy handy, so pile it on and theme it up even more with candy trim via CC borders and a round of ribbon for the cupcake stand.
Party on with the kids as they play Pin the Tail on the Cat, Bag of Bones, Wrap the Mummy, Carnival Coin Toss and even get a little Silly with String, because that is what parties are all about. That, and the sweets.
Bags stuffed with treats will finish off the party as each little goblin grabs and goes from the happy haven of the Costume Clubhouse to the haunting darkness that lurks beyond.
To create your own Costume Clubhouse party just in time for Halloween, visit the Lettering Delights site where you will find the files to make each of these decorations, party favors, games and more. Some of the games are freebies from my U-Pick button, so prowl around there for a few more treats. Also visit my earlier posts throughout October to get the scoop on each of these partying projects.

Happy Halloween to all and to all a sweet and safe night!

Wednesday, October 26, 2011

Let them eat cupcakes!

Cupcakes used to be the staple for every party during the school year when someone would have a birthday and his mom would show up at the end of the day, passing out her homemade cupcakes. Now cupcakes are making the news for every kind of celebration from first birthdays to weddings. Now you can find cupcake wrappers and toppers everywhere for every purpose.
I know where you can get the perfect cupcake wrappers and toppers for your Halloween party. I know where you can get great cake stand trim and straw toppers too. What I don’t know is if you know the secret to these wrappers and toppers.
The Costume Clubhouse Cupcake Pack and Borders from LD are the first part of this secret to your deco-party craft. How your create with them is the rest of the secret.

To make the cupcake wrappers, simply print and cut the characters of choice and wrap around your cupcakes. The toppers need only be printed, cut and have toothpicks glued to their backs before they are put into the cupcakes.
For the straws, again use the cupcake toppers and cut small slits near the top and bottom of each circled cameo to thread the straw through. This is also a great way to keep organized who has which drink as each person will be able to choose his favorite character. There are 16 different characters in this wrapper and topper set.
Now, the secret to the scalloped cake stand trim (see photo above). I designed some of the CC Borders to use for cake stand and plate trim. This is also a very simple craft to add to the look of the party. Simply print and cut the borders of choice. If you choose a border with the small slots near the straight edge (see sample below) you can then thread a ribbon, string or strip of paper through the slots and attach the trim to a cake stand or plate. Measure the circumference of the stand to determine how many borders you will need to print and cut, and then glue them together before threading the ribbon. I taped my trims onto the stands with double stick tape as it makes it easier to remove later.
One additional bit of decor that can be adapted and used are the little costume kids (from the CC Characters). Once they are printed and cut they can circulate your cake stand as if marching and chanting for their treats.
Some of the photos used in this posting are from my niece, who I was lucky enough to have with me when shooting this collection. She’s an amazing photographer who specializes in landscape and historic scenes from the mid and northwest, primarily in Montana. To see more of her beautiful photography and learn more about her go to my Besties section at the right and choose “Open Spaces Prairie Places” or click here to take you to her site.